Hollow Knight is very rigid and merciless. Making this game less grievous requires collecting items such as Pale Ore, Vessel Fragments, and Mask Shards.
Immerse yourself in the hauntingly beautiful world of "Hollow Knight," where every step unveils secrets and challenges waiting to be conquered. With its captivating art style and intricate gameplay, embark on an epic journey filled with mystery, danger, and discovery unlike any other.
Mask Shards give you additional health, and with the starting five masks, you can gain four additional ones by collecting Mask Shards. Four Mask Shards can be bought, and the other twelve are found during exploration.
This Hollow Knight Mask Shard Guide will guide you as you progress through the game so that by the end, you have acquired all sixteen Mask Shards.
Mask Shard Locations
The first four Mask Shards are relatively easily attainable. The easiest two are the starting ones that you can buy from Sly. Still, I recommend spending Geo differently, like purchasing a charm instead, as you get a new mask only after having collected four shards already that then combine into the new mask.
The Grubfather can give you the third one, and the last one to complete the set can be found in Queen’s Station if you’re not into grinding Geo for Mask Shards.
Mask Shard #1 & #2
- Location: Dirtmouth
Cost: 150 Geo & 500 Geo respectively
You can buy the first Mask Shard from Sly in Dirtmouth after finding him in his house in the Forgotten Crossroads. His house is in an abandoned village at the bottom of the Forgotten Crossroads past the optional mini-boss, the Gruz Mother. After listening to him, he will move to Dirtmouth into his shop, and you can buy your first Mask Shard.
The second Mask Shard is also in Sly’s shop and costs 500 Geo. Sly then runs out of Mask Shards, and he can’t access his backstock until you’ve found his lost Shopkeeper’s Key.
Mask Shards #3 & #4
- Location: Dirtmouth
- Cost: 800 Geo & 1500 Geo respectively
- Requirements: Shopkeeper’s Key
To unlock Sly’s further stock, you need the Shopkeeper’s Key. The Shopkeeper’s Key is in Crystal Peak in the room left of the bench, where you fight the Crystal Guardian the first time.
Mask Shard #5
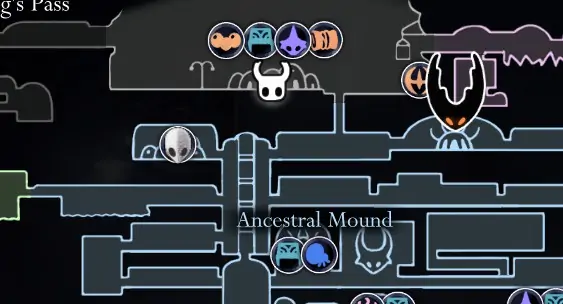
- Location: Grubhome in the Forgotten Crossroads
- Requirements: Rescue 5 Grubs
For Grubfather to give you the Mask Shard, you must rescue five Grubs and come back to him in the Forgotten Crossroads, where he will give you Geo and the Mask Shard. The list below will present the fastest way to find those five Grubs.
Grub #1
You can find the first Grub in the Forgotten Crossroads by going down the well and heading to the far right. You will encounter a Husk Guard on your way there, and the Grub will be right behind him.
Grubs #2 & #3
The second Grub is also in the Forgotten Crossroads northeast of the bench by the Stag Station. Right in the next room, a few platforms up, you will hear the Grub, and he will be behind a breakable wall on the left side of the platform.
You can also find the third Grub here by heading to the passage at the bottom of the room and navigating below the Soul Totem on the right. From there, you can head upwards where the Aspid Mothers are and go into the entrance on the left. The Grub will be on the left of the room, and you can reach it by Nail-bouncing off the spikes.
Grub #4
The fourth Grub is on the right from the well past the vertical room (the room from which you enter the Grubhome). Go to the bottom and into the room below and locate the passage on the left. You will need to pass a short platforming part where you’ll encounter another Aspid Mother and find the Grub at the end.
Grub #5
For the last Grub, you will need to go to Greenpath, and right above where Cornifer the map maker’s papers are, there’s a secret room in the ceiling. You will see the vine to cut the platform down and get the last Grub.
Mask Shard #6
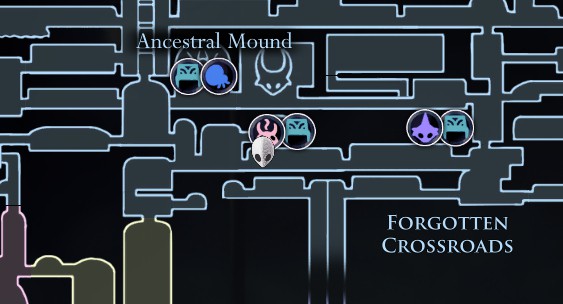
- Location: Forgotten Crossroads
- Requirements: Mantis Claw
The sixth Mash Shard is easily accessible with the Mantis Claw, but without it, you will have to agro and Nail-bounce off of the one surrounding mosquito to get up to the platform on the ceiling. Goams that come out of the ground and walls are the only things stopping you from getting this Mask Shard.
Mask Shard #7
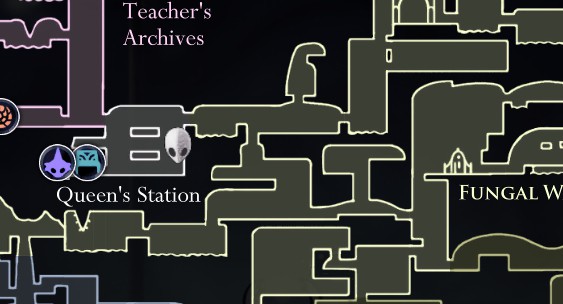
- Location: Queen’s Station in Fungal Wastes
- Requirements: Mantis Claw
This Mask Shard requires you to have already obtained the Mantis Claw. It is located left of the Stag Station, and all you have to do is pass through the short spike-covered platforming part.
Mask Shard #8
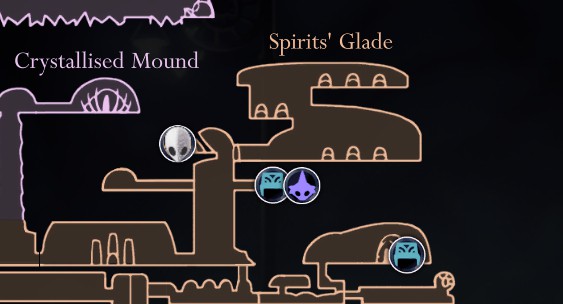
- Location: Resting Grounds
- Requirements: 1500 Essence
After collecting 1500 Essence Seer will give you a Mask Shard. Take a look at this guide here to help you get that Essence fast.
Mask Shard #9
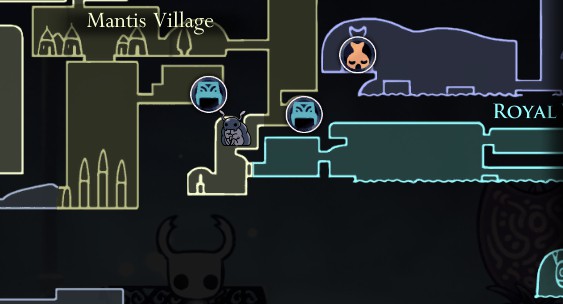
- Location: Dirtmouth
- Requirements: Rescuing Bretta from Fungal Wastes
You can find a Mask Shard in Bretta’s house if you’ve found her in Fungal Wastes. You need dash to get to her.
You have to travel to the southeast part of the Mantis Village, and you will see her behind a wall. Pass the statue of the Dash Master, and if you continue going in that direction, you will get to the spike platforming section above.
If it looks like you can’t jump over the step on the wall, you can’t without double jump. You can dash to the other side, and you will easily pass the other wall and get to Bretta.
Mask Shard #10
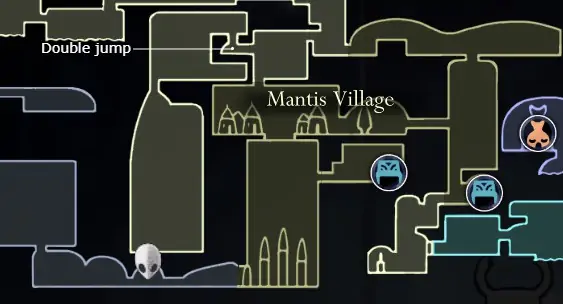
- Location: Deepnest, entrance from Fungal Core
- Requirements: Monarch Wings
You’ve maybe been here without double jump, and it may have driven you insane.
The tenth Mask Shard is right at the entrance into Deepnest from Fungal Core in Fungal Wastes. This is the only way to get it. You need to have double jump for this one. After passing this part where the double jump is required, keep going down, and you’ll fall into Deepnest right onto the Mask Shard.
Mask Shard #11
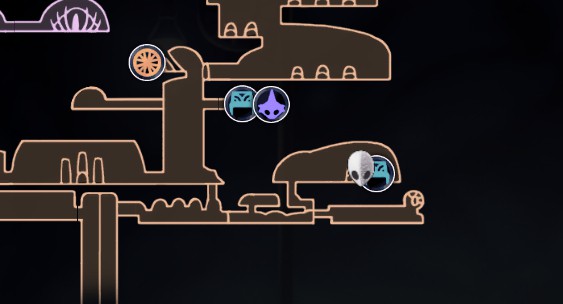
- Location: Forgotten Crossroads
- Requirements: Defeating the optional mini-boss Brooding Mawlek
The eleventh Mask Shard is located right beneath the entrance to Greenpath. After passing a small platforming part, you will walk directly into the Brooding Mawlek arena. You can Nail-bounce off the spikes, but having the Mantis Claw makes the platforming problem-free.
I recommend having some Nail upgrades before challenging him as he has 300 health, and your Nail does 5 damage if you haven’t found the Nailsmith yet.
The fight will be much more manageable with the Mark of Pride and Longnail charms, and I highly advise obtaining dash before this, but it is possible to Nail-bounce off his teeth to the other side. Don’t forget to use Soul in the most reasonable way you can, whether that be healing or using spells.
Upon defeating him, he will drop a Mask Shard, and you can find a breakable wall on the right.
Mask Shard #12
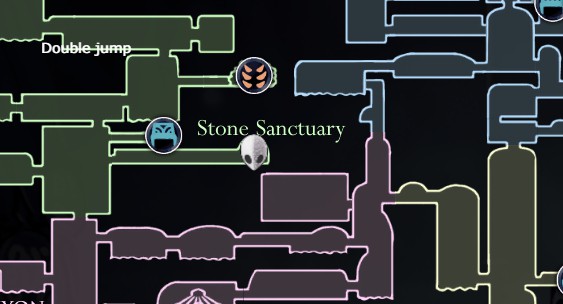
- Location: Stone Sanctuary in Greenpath
- Recommended: A Lumafly Lantern (Can be purchased from Sly. Cost: 1800 Geo)
The twelfth Mask Shard is behind the Dream Warrior No Eyes’ arena in Greenpath, right below the second bench. Dream Warrior graves are primarily for collecting Essence, and Dream Warrior fights are optional. You can go past her and collect the Mask Shard.
Mask Shard #13
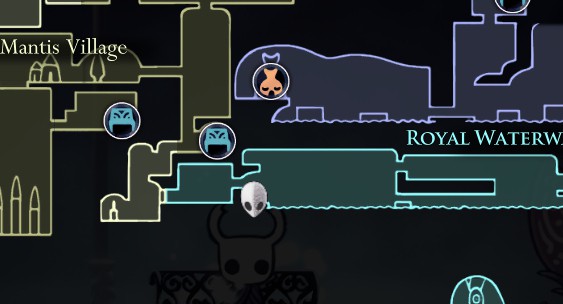
- Location: Royal Waterways
- Recommended: Isma’s Tear
The thirteenth Mask Shard is on the far left on the bottom of the Royal Waterways under Cornifer. You can, by pure luck, get this one without Isma’s Tear with dash only.
After defeating the Dung Defender, you can get Isma’s Tear on the other side of the Royal Waterways. You will need Desolate Dive and Crystal Heart, but this will make getting the Mask Shard less impossible.
Mask Shard #14
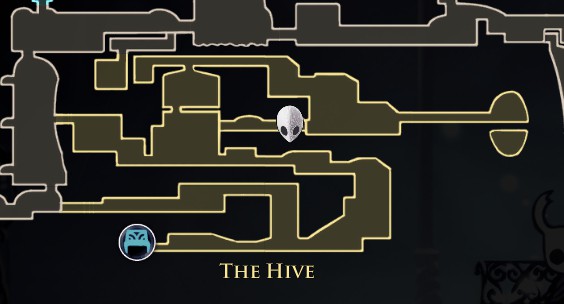
- Location: The Hive
The fourteenth Mask Shard is in the Hive. From the Tram in Kindom’s Edge, go right until you see a couple of bees. They’re right next to a breakable wall.
Once you’re in, you will have to make your way to almost the very end of the Hive, and you’ll notice a very distinct breakable wall and even see the Mask Shard behind it, but you can’t break it yourself. You need to trick one of the giant Hive Guardians to smash the wall for you, and it isn’t tricky to do. Just make sure you don’t kill them all before doing this.
Mask Shard #15
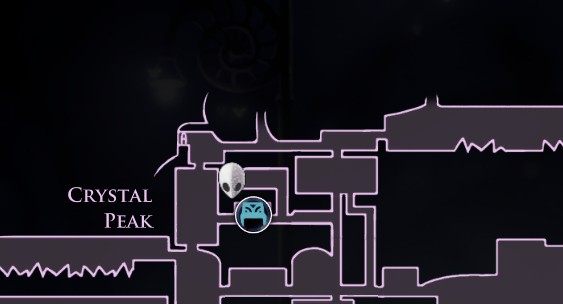
- Location: Crystal Peak
- Requirements: Defeating the Enraged Guardian
The fifteenth Mask Shard is above the room where you fought the Crystal Guardian for the first time. You need double jump to get to him. The second fight is much more challenging than the first, but his health increases with your Nail level, which sounds terrible, but isn’t. With maximum Nail upgrades, he will take more than three times less hits to take down.
I put it this low on this list because of that, as it is one of the hardest Mask Shards to acquire, but if you go into this fight chasing your last mask, you already have new upgrades (one being the double jump), Nail upgrades, charms, and spells that you can use against him.
You won’t have many chances to heal, so I suggest going into this fight with charms that boost your Nail damage and range.
Mask Shard #16

- Location: Resting Grounds
- Requirements: Delicate Flower quest
For the last Mask Shard, you first have to find the Grey Mourner in the Resting Grounds. She is right above the chest that drops one Geo and leads you to the Balur Shell charm.
The Delicate Flower quest requires you to take a flower from her to the grave of the Mantis Lord daughter’s grave in Queen’s Gardens without using the Dreamgate or Stagways and without taking damage.
You can place a Dreamgate in front of her house next to the bench, as this will likely take you more than one try to complete. Another thing that will help you out is finding a path that best suits you and clearing it out before starting the question. Most of the enemies won’t respawn unless you sit at a bench.
To be even more secure, you can equip the Baldur Shell as it can take up four hits until it breaks while you’re focusing. You have to have enough Soul to start focusing so if you’re in a crutch, a panic heal isn’t such a bad decision. The other two charms that I recommend taking along on this journey are Sprintmaster and Grubberfly’s Elegy.
Sprintmaster gives you movement speed, and Grubberfly’s Elegy turns your Nail into a long-range weapon when you’re at full health. A combination of these and whichever other charms you’ve become comfortable with would give you that little extra security that will save you from having to do this more times than you need to.
Think of it this way: you only have to do this once and return to the Grey Mourner and get the last Mask Shard, and then never again.
Immerse yourself in the hauntingly beautiful world of "Hollow Knight," where every step unveils secrets and challenges waiting to be conquered. With its captivating art style and intricate gameplay, embark on an epic journey filled with mystery, danger, and discovery unlike any other.
FAQs
Question: What Does a Mask Shard Do in Hollow Knight?
Answer: Mask Shards give you additional health, and with the starting five masks, you can gain four additional ones by collecting Mask Shards.
Question: How Many Mask Shards are in Hollow Knight?
Answer: Four Mask Shards can be bought, and the other twelve are found during exploration.
Question: How Do You Get the Bretta Mask Shard?
Answer: You can find a Mask Shard in Bretta’s house if you’ve found her in Fungal Wastes. You need dash to get to her.
Question: How Do You Get the Mask Fragment in Hollow Knight?
Answer: You can buy them or find them during exploration. This Hollow Knight Mask Shard Guide will guide you as you progress through the game so that by the end, you have acquired all sixteen Mask Shards.
Question: What’s the Max Amount of Masks in Hollow Knight?
Answer: With the sixteen Mask Shards, you can have nine masks. With the Fragile or Unbreakable Heart charm equipped, you will always have two more. The Lifeblood Heart charm when equipped gives you two additional masks and the Lifeblood Core charm gives you four additional masks when resting on a bench.
Question: Where Can I Play Hollow Knight?
Answer: Hollow Knight is a video game available on Xbox One, PS4, Nintendo Switch, and PC
Question: What are the Best Hollow Knight Alternatives?
Answer: This dark, yet wonderful Metroidvania adventure is a brilliant one, but if you have experienced all that it has to offer, you might want to try some similar video games like these:
• Ori and the Will of the Wisps
• Metroid Dread
• Dark Soul Series
• F.I.S.T. Forged in Shadow Torch
• Castlevania: Symphony of the Night
• Little Nightmares
Conclusion
Having nine masks will firstly and obviously give you four more chances to stay alive in battle, but with particular charms, you can expand that capacity. Certain charms like Grubberfly’s Elegy won’t work with Lifeblood masks unless you’re on full health as they’re not counted as true masks.
Having just one mask more than what you started with will make the game feel much easier than what it was so far; it’s a rewarding feeling. You will be surprised when you don’t die after that fifth hit, and in some cases, it can come in clutch.
After getting all sixteen Mask Shards, you’re set, and there’s no need to keep looking for Mask Shards, you completionist.
- Salt and Sacrifice Review - June 17, 2023
- Hollow Knight Defender’s Crest Guide - February 15, 2023
- Hollow Knight Wanderer’s Journal Guide - January 21, 2023

